


Compiled & shared by-DR. RAJESH KUMAR SINGH, (LIVESTOCK & POULTRY CONSULTANT), JAMSHEDPUR, JHARKHAND,INDIA 9431309542, rajeshsinghvet@gmail.com
A livestock farmer is expected to establish the identity of an animal as soon as the animal is born or some days after birth. A lot of farmers have ignored animal identification which is very important. Giving names to farm animals may serve the purpose to an extent for a small heard, but may not be feasible for a large herd or farm with many animals. So it is important to put some sort of identification marks on each animal present on a farm. Some of the importance of identification includes:
It makes record keeping easy for a livestock farmer or animal breeder.
It makes treatment or culling of sick or unproductive animalseasy.
It makes it easy for a breeder to select replacement stock for the next breeding season.
There are various methods that can be used to identify an animal. These include ear tagging, ear tattooing, number tagging, branding and ear notching.
Ear tagging———
BEING able to identify individual animals on your property is critical to good farm management.
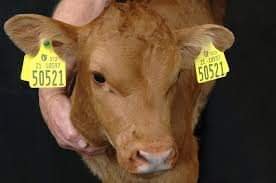
One of the most common methods of identifying livestock is to apply an ear tag. While this is not as reliable as branding, ear notching or ear tattooing, it is quick and allows for visual or electronic identification of each animal.
Ear tags are metals pieces that have letters or numbers engraved on them. They are of two types and they include; self-piercing tags and the ones that require that a hole is made in the ear of the animal using an ear punch. Normally, these tags are inserted within one-third of the way out from the base of the animal’s ear and the upper edge of the animal’s ear with the number at the top.
How to Properly Tag Cattle——————-
There are many critical management practices that are necessary to efficiently run a cattle operation. Ear tagging is an essential part of farm or ranch procedures and can aid in identification. It is important to use this practice properly to avoid infection or tag lose. To properly tag a cow or calf one must understand the importance of placement, identification, precautions, and use of the tag applicator.
Ear tags help us to keep track and record information such as gender, age, weight, when a cow last calved, number of calves she has had, etc. There are three important tools to use when placing an ear tag; the applicator, stud, and button. Knowing how to properly use these components will aid in avoiding complications. Tags are an essential identification tool that can carry a variety of information and help both farmers and ranchers in their operations. When applying a tag, reduced head movement will aid in assuring that the tag is placed in the correct position. Management of the applicator is also important, and one must know how to properly use and clean this tool.
Step 1: Catching and Restricting Movement
Before an ear tag can be applied the animal must be caught and restrained to limit head movement and ensure accurate tag position. When a new calf is born their mother’s instinct is to protect them and this is a very helpful sense. However, when it comes to a handler ensuring that the calf gets the necessary attention, it can become dangerous. This is where a calf cage can be helpful. This tool allows the calf to be caught, cared for, and tagged without putting any individuals at risk of injury. Many times a single individual is able to secure the calf to be tagged without help. As the livestock gets older a head gate is required. This allows the animal’s head to be secured and the individual tagging to be out of harm’s way.
Step 2: Significance or Ear Tag Color
The main reason for using ear tags is to better our ability to identify our livestock. When it comes to the color of tag producers use, there is great significance. Not only is the color important, but the ear that is tagged can also have significant meaning. Each farm can decide on their own method for identifying their cows. For example, a rancher may decide that an orange tag signifies a heifer while a yellow tag signifies a steer, or left ear signifies heifer while right signifies steer. Many combinations can be established with a multitude of meanings. The color and ear choice rely solely on the producer’s preferences, however when a choice has been made it is best to stick with it throughout each herd owned.
Step 3: Significance of Identification Number
Another identification tool is assigning a number to each animal. In many operations, there is only a number on each tag but sire, dam, and date of birth can also be added. Numbers are given to help with cattle inventory and are necessary for recording data for different circumstances. With older cows, it can help to identify the approximate breeding date, calving date, health and medical records, calving history, and possibly which pasture she is located. Numbers are used on calves to identify which cow it belongs to, date of birth, vaccinations, and any other concerns. It is important to label clearly and to write the animals identification information as large as possible so that it can be viewed from a distance. When writing on a tag be sure to use a designated tagging marker, regular and permanent markers fade with time and become hard to read.
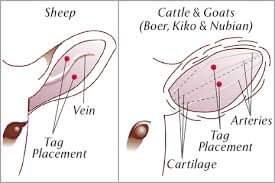
Step 4: Tag Placement
Once a cow or calf has been chosen, colors are picked, and the identification information is on the tag it is time to start the process. If placed incorrectly, a tag could potentially cause problems, therefore location is very important. The ideal location to place an ear tag is in the middle one-third of the ear. The location should be between the rises in auricular cartilage or the ribs. If a tag is placed too far towards the inside of the ear it will fit tightly due to the presence of thicker cartilage. This may also cause necrosis, the death of cells in the tissue, or sloughing tissue which is the shedding of dead cells. Tags placed too far to the outside of the ear have the possibility to be snagged or ripped out. Proper tag placement is also important to reduce the risk of infection.
Step 5: Proper Use of the Applicator
Priming the Applicator–
1 Select the best type of tag for your cattle.
Basic plastic tags are the most common and least expensive means of identification used by small-lot farmers. These feature a broad, flat display panel bearing an easy-to-read ID number. There are also more sophisticated electronic identification systems (EIDs), which make it possible for ranchers to track their livestock remotely via special radio frequencies.
• The decision of which type of tag to use may come down to the size of your herd, the acreage you’ve allotted for grazing, or the amount of money you’re willing to spend on simplifying the identification process.
• If you’re tagging an animal for the first time, don’t forget to note its age or purchase date on paper in case something happens to the tag.
2 Clean the applicator to decrease
the risk of infection. For the wellbeing of your livestock, it’s important that all materials that come into contact with the cow’s ear be properly sterilized beforehand. Wipe down the pin (male) and clip (female) components with rubbing alcohol or a disinfecting solution like chlorhexidine or betadine. This will help eliminate any bacteria present.[5]
• You can also swab the inner and outer surfaces of the cow’s ear using a cloth or cotton ball soaked in alcohol for added protection. Take care not to let any of the solution drip into the ear canal itself.
• Be sure to clean the applicator thoroughly before and after use.
• In addition to protecting your cows from infection, cleaning and disinfecting the applicator after each tagging session will keep it working longer.
3 Load the two halves of the tag into the applicator.
Insert the pointed stud on the backside of the visual panel onto the long, slender pin. Then, fit the button or backing into the clip on the opposite arm of the applicator. Double-check that both pieces are fully inserted and attached securely before moving on.
• New applicator tools are often labelled with diagram stickers indicating where each piece goes and how to load it correctly.
• Make sure that the panel of the tag is facing away from the male stud piece so that it will be visible from the outside of the cow’s ear.
4 Check the alignment of the applicator jaw.
Before you get to tagging, give your applicator a practice run. Squeeze the handles of the device together slowly so that the jaw closes to the point just before the two tag pieces meet. The stud should be perfectly centered with the hole in the backing piece.
• If the hole and stud are out of alignment, it may be necessary to remove and reload them.
• Be careful not to close the jaw completely, or you’ll have wasted a tag.
1 Position the applicator over the tagging site.
Hold the applicator in your dominant hand and use the other to gently stretch and flatten the cow’s ear. The jaws of the device should be hovering above the soft central part of the ear you pinpointed earlier.
• Remember to keep to the fleshy tissue, and avoid cartilage, visible blood vessels, or other easily-damaged structures.
2 Clamp the applicator shut firmly and quickly.
Squeeze the handles together in 1 smooth motion. You’ll hear a loud click as the 2 halves of the tag come together. Once the tag is in place, release the handles and pull the applicator away. Speak to the cow in a soft voice and stroke its head and neck to keep it calm as its momentary discomfort passes, but avoid touching its ears.
• You’ll need to be quick to get the tag in before the cow moves its head.
• Don’t put any pressure on the applicator handles until you’re ready to insert the tag. Failing to successfully apply the tag on the first attempt will only cause unnecessary pain.
3 Inspect the finished tag.
Check to make sure the tag is correctly positioned, is secure, and doesn’t appear to be causing the cow any discomfort. It may be a good idea to jot down the animal’s unique identifying code or number in case you need to adjust the tag later on.
• When using an electronic identification device (EID), it’s important that the visual panel (the face of the male piece) be situated on the outer part of the ear where it can be seen clearly and easily.
4 Tag the other ear if desired.
Many ranchers tag both ears of their cattle to make them easier to read from either side. Some even insert an additional EID or RFID device along with traditional panel tags. If you decide that it’s necessary to apply a second tag, repeat the process the same way you did the first.
5 Let the cow go.
Once the tag is in position, release the animal from the chute and free it from its lead rope. The newly-attached tag should remain in place for several years, allow you to track, identify, and account for the cow among the rest of your livestock more easily.
• Sturdy metal identifying buttons tend to stay put longer than flimsy plastic tags.
6 Check the tagging site for signs of infection for the next 5-7 days.
Keep a close eye on the area around the tag. Any excessive redness, swelling, or discharge you observe should be treated as a serious concern. Applying a topical disinfectant like rubbing alcohol or hydrogen peroxide can go a long way in preventing infection, especially if your cattle spend a lot of time grazing in wet conditions.
• Continue treating the tagging site with disinfectant for at least 3-5 days after the puncture has healed.
• If infection symptoms don’t begin to clear up within about a week, contact a large animal veterinarian for a more advanced course of treatment.
Here is details about the technical specification of eartag & applicator: Plz download from here.
TECHNICAL SPECIFICATIONS OF EARTAG EARTAG APPLICATOR