


DOGS RESTRAINING TECHNIQUES DURING EXAMINATION
Of all the species you’ll encounter, the dog will likely display the greatest range of reactions to restraint and handling.Some dogs are calm and cooperative; others respond aggres-
sively. These reactions can differ from the dog’s customary demeanor. Often a dog that’s docile and friendly at home
reacts differently in a veterinary hospital
Collars and leashes. —
Any dog you’re handling should wear
at least a collar, which allows easier control should the dog suddenly begin to resist. Several types of collars serve this purpose. Remember, whichever you choose, any collar must be the correct size. Most dogs can easily slip out of a collar that’s too large, and risk injury from a collar that’s too small.
(A growing puppy should receive new collars to accommodate its changing size.)
Types of collars and leashes.——
Training collars consist of
stainless-steel links with a ring at each end (Figure 1A). The
links can be a variety of thicknesses. In general, the thicker
links are used for very large, muscular dogs, while thinner links
are best for smaller breeds. Training collars are sometimes
incorrectly referred to as “choke” collars. A properly-used
training collar never chokes the animal. You must, however,
apply it correctly to avoid injuring the dog. Choose a collar
approximately two inches longer than the circumference of
the dog’s neck. The collar should slip easily but snugly over
the dog’s head (Figure 1B). The loose end, which takes the
leash, should come over the back of the dog at the top of, not
underneath, its neck (Figure 1C). Once the collar and leash
are in the appropriate position, you can lead the animal,
but never pull the collar tight. Apply short, firm tugs that
momentarily tighten the collar. Never leave a training collar
on an unattended dog. These collars catch easily on cage
bars and similar surfaces, and thus can seriously injure or
kill a dog.
Nylon or leather flat collars are most appropriate for daily
home use. However, don’t rely on a flat collar for restraint; dogs can easily slip out of them, and some flat collars are
designed to release quickly so that they don’t catch on something and choke the dog.
Any dog you’re leading should wear a leash (Figure 2). Leashes
can also aid restraint, and help to prevent animal-to-animal
contact in the waiting room. There are many kinds of dog
leashes on the market. Veterinary practices often use a slip
leash, one made of flat or braided nylon with a metal ring
at one end, on all patients. A slip leash applied prior to
examination may help to control a dog that resists handling
or escapes from its handler. A dog wearing a slip leash is
also easier to remove from a cage. Apply the slip leash as you
would a training collar. Many veterinary practices imprint
these inexpensive leashes with their practice name and give
them as gifts to new clients.
Leashes are also made of rope, nylon, chain, or leather, with
clips to attach directly to a collar. Leather leashes tend to be
quite expensive and are rarely used in veterinary practice.
Leashes come in many thicknesses and lengths. Always use thicker leashes on large dogs. A thinner leash may break if a large dog pulls against it. Shorter leashes are appropriate for moving animals from place to place in the veterinary practice; longer leashes allow the animal to exercise.
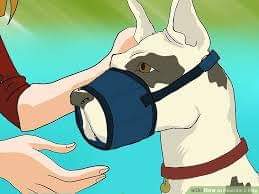
Muzzles——-
A muzzle is any device applied around an animal’s
nose and mouth to prevent the animal from biting. Any dog
that may become aggressive during examination or treatment
should wear a muzzle, applied before the animal shows signs
of fear or aggression. Muzzle application can also temporarily
distract a dog and allow you to complete a procedure. Several
types of muzzles are available; you can also improvise a
muzzle out of available materials. Whatever muzzle you choose,
take care that you don’t put it on any dog with signs of
breathing difficulties or chest injury. Also, make sure that
you don’t leave the muzzle on too long. Some muzzles prevent
a dog from panting, which it must do to avoid overheating.
Muzzles left in place too long can also injure the dog. Finally,
a dog that vomits while wearing a muzzle is likely to aspirate
the vomit.
Plastic, leather, or wire-basket muzzles are available in a
variety of sizes. This last type of muzzle is a small cup placed
over the end of the dog’s nose and clipped behind its ears.
Because these muzzles allow the dog to pant, you can leave
them on longer; some dogs, however, are able to bite through
this type of muzzle.
Nylon muzzles, more common in veterinary practice, slip over
the dog’s nose and clip behind the head (Figure 3). Some
nylon muzzles aren’t adjustable, but most veterinary prac-
tices keep enough sizes of them on hand to make the correct
size always available. Ensure the muzzle you choose fits
snugly but isn’t overly tight. Wash the muzzle promptly after
you remove it.
When you don’t have a commercial muzzle, you can impro-
vise your own from available materials. If the dog has a nylon or leather leash attached to its collar, create a temporary
muzzle by wrapping a portion of the leash around the animal’s mouth (Figure 4). Take care not to pull the leash
tightly. The leash should be just tight enough to keep the
animal from opening its mouth.
You can also make a muzzle out of gauze roll bandage. To make a gauze muzzle,
Step 1: Take a long piece of bandage and tie a large loop at
its midsection (Figure 5A).
Step 2: Approach the dog from the side or back and slip
the loop over the end of the dog’s nose (Figure 5B).
Step 3: Quickly tighten the loop and bring the ends of the
gauze under the dog’s neck (Figure 5C).
Step 4: Cross the ends over, then pull the ends behind the
dog’s neck (Figure 5D).
Step 5: Tie the ends of the gauze in a half bow or slip knot
so that it can be removed quickly (Figure 5E).
You must modify this technique for dogs with short or pug noses. For pug-nosed dogs, slip the loop over the dog’s nose with the tie under the jaw. Pull the ends of the gauze behind the ears, then tie them securely. One of the ends of the gauze should then be drawn down across the dog’s forehead and slid under the loop at the top of the nose, to keep the loop from slipping off the end of the dog’s nose.
Head snares——-
Vicious dogs should be caught and restrained
with a head snare, sometimes called a “rabies pole” or a
“restraint pole” (Figure 6A). The head snare is a long metal
or heavy-duty plastic tubular handle with a thick retractable
wire inside it. This wire is long enough for a large loop of it to
be pulled out, slipped over the dog’s head, and quickly tight-
ened (Figure 6B). The snare handle allows you to keep the
animal at a safe distance (Figure 6C). Once the snare has
served its purpose, a quick release mechanism loosens the
loop for easy removal from the dog’s neck. Dogs that are
especially strong may require two handlers, each with a head
snare attached to the animal, to lead the dog. Make sure that
the snare will release easily when necessary.
Whenever possible, allow a dog to approach you first. Often
a fearful dog simply needs reassurance that you aren’t a
threat. Crouch or kneel down on the floor and coax the dog
slowly (Figure 7). Verbally reassure the dog with a calm,
cheerful tone of voice. Allow the dog to approach voluntarily.
If you must approach a dog, always do so carefully and
slowly. Make sure that the dog can both see and hear you
coming. Observe the dog closely for any signs of fear or
aggression. Slowly hold out your hand, making sure that
your hand is no higher than the dog’s nose. The dog may
perceive gestures above its nose as threatening, and respond
aggressively. Above-the-nose gestures include bending over
the dog or attempting to pat its head when it’s still unsure of
you. Once the dog has approached you and is accepting your
handling without signs of fear, you may slip a leash over its
neck or lift it onto the examination table.
picking up and carrying a dog.——-
The proper method of
picking up and carrying a dog depends upon the dog’s size
and health. Two prerequisites before picking up a dog: apply
a leash, and crouch beside the animal. The leash helps pre-
vent the dog from escaping. The crouch spares your back.
Lifting even a small dog from a standing position can injure
your back. To lift a small, uninjured dog, which weighs less
than 50 lbs,
Step 1: Place one arm under the dog’s head.
Step 2: Place your other arm under the dog’s abdomen
with your hand pointed forward and your fingers
between the dog’s front legs.
Step 3: Lift the dog straight up and place it on the examin-
ing table.
You can even carry small dogs in this position. To lift a small dog that’s injured or may be injured,
Step 1: Place one arm under the dog’s head (Figure 8A).
Step 2: Place your other arm around the dog’s hind-
quarters (Figure 8B).
Step 3: Lift the dog straight up and place it on the examin-
ing table (Figure 8C).
Taking a dog from its owner.——-
Some dogs are very protective of their owners, and may respond more aggressively than they would in the owner’s absence. Follow the same approaching guidelines when you approach a dog that’s with its owner, but also make sure that you talk in a reassuring tone to both dog and owner. Be especially careful not to make sudden movements. Look at the dog, but don’t stare. Some dogs
interpret staring as a threat or challenge.
Take the dog’s leash from its owner and ask the owner to
walk away from the dog. If you must lead the dog away from the owner, coax the dog with a cheerful and calm tone.
Removing a dog from a cage.———
Before you remove a dog from
a cage, find out if the dog can stand and walk. If it can, and
it has no neck, throat, or aggressiveness problems, partially
open the cage door and put a slip leash around the dog’s
neck (Figure 10). The leash prevents the dog from escaping
once the cage door is fully opened; it also permits some con-
trol should the dog become aggressive. To slide a slip leash
over the dog’s neck without fully opening the cage door, wait
at the front of the cage and let the dog approach you. If the
dog is small and docile, grasp it by placing one arm under
its body and the other arm under its neck (Figure 11). Place
the slip leash while holding the dog in this position. If the
dog is small but aggressive, place a blanket or towel around
it before lifting.
Uncaging larger, more aggressive dogs usually requires special handling. Many veterinary practices keep these dogs leashed, with the leash slipped through the bars of the cage door, which allows the handler to move the dog toward the door by gently pulling the leash. This technique keeps the door between the handler and a dog that may try to bite.
If the dog can’t walk or stand, a leash is unnecessary; gently
lift the dog from the cage. For animals with neck or throat
problems, use a chest harness instead of a leash. You may
also need to remove the leash and apply a harness if the
leash interferes with a medical device, like an intravenous
catheter, to be placed in the dog’s jugular vein.
The appropriate restraint method for a dog depends upon
what the veterinarian is doing, and upon its overall tempera-
ment. Veterinarians perform most dog examinations and
treatments on a table; your job is to keep the dog in position.
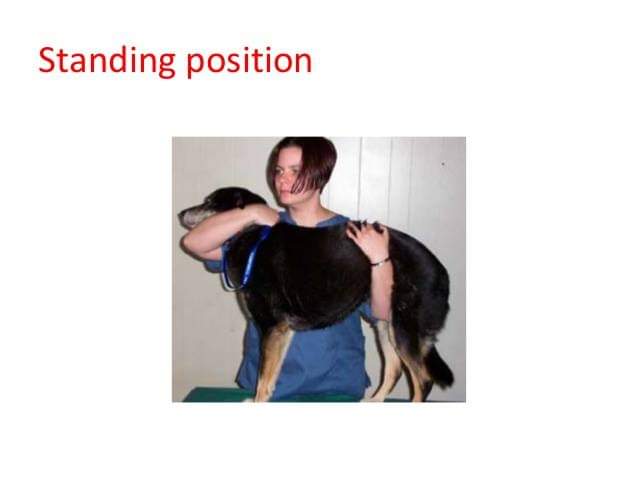
Standing restraint———
. Veterinarians often complete routine
physical examinations with the dog standing. To maintain a dog in a standing position,
Step 1: Place one hand in front of the dog’s neck (Figure 12A).
Step 2: Place the other hand under the dog’s abdomen just
in front of its rear legs (Figure 12B).
Step 3: Gently pull the dog toward you until it’s snug
against your body (Figure 12C).
Hold this position until the examination is complete. As
usual, practice the minimum necessary restraint; being held too tightly can make some dogs fearful.
A variation of this standing-restraint technique is to place
your second arm around the dog’s hindquarters rather than under its abdomen. While this technique gives you more control over the dog, it may interfere with some procedures, like rectal examination.
Sitting restraint.———
Some dogs require restraint firmer than
you can obtain with the standing position. For these dogs,
you can employ sitting restraint. The sitting position is also
appropriate for most routine injections and some minor tech-
nical procedures. To perform sitting restraint on a dog,
Step 1: Place your arm around the dog’s hindquarters
(Figure 13A).
Step 2: Gently tuck the dog into a sitting position
(Figure 13B).
Step 3: Place your other arm around the dog’s neck so
that its head rests in the crook of your elbow
(Figure 13C).
Step 4: Pull the dog snugly against your body (Figure 13D).
Restraining puppies———.
You can restrain puppies much as
you would adult dogs, but with a much gentler touch.
Whenever possible, remove the bitch from the room before
any examination or treatment of her puppies. If for some reason you can’t remove the bitch, keep her puppies as calm as possible. A puppy that makes vocal signs of pain or distress may cause the bitch to attack.
Restraint of injured or ill dogs. ————
Handle a severely ill or
injured dog as if it’s likely to bite. Many times a severely injured
or ill animal responds out of extreme pain, and biting is a dog’s
major defense against pain. Take extra precautions when
handling any injured animal. To prevent a human injury,
place a muzzle on an injured animal. You may, if necessary,
place a towel or blanket over a particularly violent animal to
calm it. Just make sure you move the dog to a proper examina-
tion area promptly—this draping technique often produces
only a brief period of calm.
Dog restraint for venipuncture.————
Venipuncture, puncturing
a vein to collect blood or administer medication, requires
careful and firm restraint. A dog that struggles during
venipuncture could damage the vein. Restraint techniques
for venipuncture vary depending upon the vein. A dog’s most
common venipuncture sites are the cephalic vein, along the
front of the dog’s foreleg (Figure 15); the saphenous vein, on
the outer surface of the dog’s hindleg (Figure 16); and the
jugular vein, on the front of the dog’s neck (Figure 17).
Venipuncture restraint requires careful positioning so that
the vein is accessible and the dog can’t move. You may also
be expected to occlude the vein (block the vein’s circulation
by pressing on it with your finger). Occluding or “holding off”
the vein pools blood in the vein, allowing it to be easily seen
and felt. Occluding the vein also provides enough blood for
proper venipuncture.
A dog undergoing cephalic venipuncture is usually placed on
its sternum (breastbone) on the examination table, its forelegs
extending slightly over the table’s edge (Figure 18A). This type
of restraint is called sternal recumbency. To restrain a dog for
cephalic venipuncture,
Step 1: Stand at the side of the table, facing in the same
direction as the dog.
Step 2: Grasp the dog under its neck so that its head rests
in the crook of one elbow (Figure 18B).
Step 3: Place your other arm across the dog’s back and
pull the dog snugly against your body (Figure 18C)
Step 4: Extend the same arm to grasp the dog’s opposite
forelimb at elbow level with your right hand.
Step 5: Hold the forelimb at the elbow and use your thumb
to occlude the vein by pressing in and slightly to
the side (Figure 18D).
The dog’s elbow should be at the table’s edge, which allows
the veterinarian or veterinary technician to grasp the dog’s
foot and complete the venipuncture (Figure 18E). Should the
dog struggle, reassure it with a firm voice and hold it a bit
more tightly. You may also try distracting the dog by lightly
scratching the side of its head with yoThe dog may experience momentary pain when the vein is
punctured. Don’t release the animal from your grasp, or
remove your hand from its leg, until the venipuncturist tells
you to (Figure 18G). A veterinarian or veterinary technician
withdrawing blood or administering medication will tell you
when it’s time to release the occlusion of the veinur left hand (Figure 18F Once the needle is removed from the vein, maintain your
grasp on the leg and place your thumb over the injection site to prevent further bleeding. Applying pressure at this site helps the blood to clot.
Step 6: Maintain your grasp on the leg and simply lift your
thumb straight off it. Place your thumb over the
injection site while applying pressure. Continue to
hold the dog firmly.
Step 7: Once the procedure is complete, slowly loosen your
grip. Maintain moderate restraint to keep the dog
from jumping off the table.
Restraint for saphenic venipuncture often requires that the dog be restrained in the lateral recumbent position (as do some x-ray examinations and technical procedures). To restrain a dog for saphenous venipuncture,
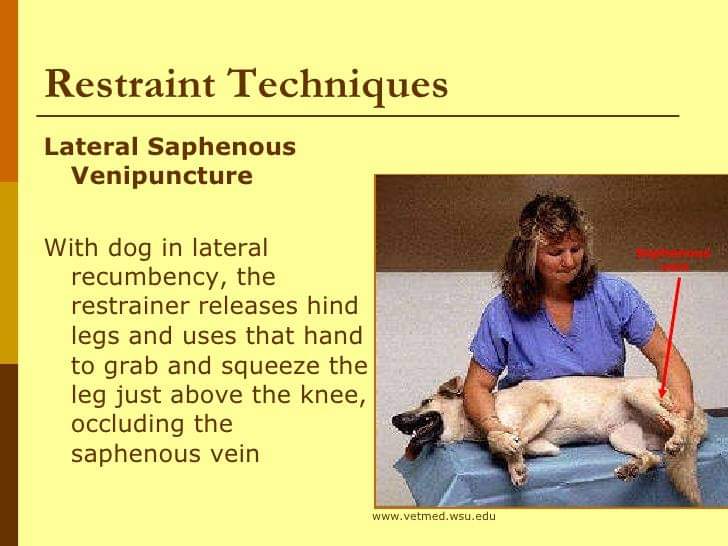
Step 1: Position the dog in lateral recumbency (Figure 19A).
Step 2: Grasp the upper rear leg just below the knee so
that the skin over the vein is pulled tight to
occlude the vein and prevent it from “rolling” while
venipuncture is being made (Figures 19B and 19C).
Step 3: Release the vein when directed by the veterinarian
or veterinary technician. By using this procedure,
medication can be administered or a catheter can
be passed into the vein.
Step 4: Apply pressure to the venipuncture site to allow
a clot to form and bleeding to completely stop
(Figure 19D).
Step 5: Once the procedure is complete, maintain moderate
restraint to keep the dog from jumping off the table.
It’s often helpful, should the dog struggle in this position, to
raise the legs closest to the table so that they cross the upper
legs.
Jugular venipuncture, like cephalic venipuncture, positions the dog on its sternum at the table’s edge with its forelegs extending off the table (Figure 20A). To restrain a dog for jugular venipuncture
Step 1: Stand alongside the dog and place your right hand
under its muzzle.
Step 2: Point the dog’s head toward the ceiling. You may
have to hold the dog’s mouth closed with your
hand (Figure 20B).
Step 3: With your left hand, grasp the dog’s front legs just
above the feet and hold them together. Secure your
grip by placing a finger between them (Figure 20C).
Step 4: Pull the feet slightly to align them with the dog’s
nose. The venipuncturist will normally occlude the vein without further assistance (Figure 20D).
Step 5: Once the procedure is finished, apply pressure to
the venipuncture site.
Bring on the dogs—you’ve now covered the basics of dog
restraint. However, what about cats? If you’ve spent any time
around them at all, you know some of the challenges cats
present. It isn’t easy, but yes, it’s possible to restrain our
feline friends.
Before moving on to cat restraint, take a few moments to complete
Compiled  & Shared by- Team, LITD (Livestock Institute of Training & Development)


Image-Courtesy-Google


Reference-On Request.