


Milking Methods in Dairy Cow in India
India is ranked 1st in milk production contributing 23 per cent of global milk production But quality milk production has always been an issue in India which is always been neglected. But now being the leader in milk production in world we are now focused on quality milk production. Clean milk production has always been the biggest concern for both producers and consumers. With regards to limiting mastitis and bringing down substantial somatic cell counts, the region where we have the most control is our milking systems. This is a basic advance to keeping up most extreme milk quality. Milking process should be done at regular intervals and time of milking should also be fixed at the same time every day. The basic goal of the milking process is to
• Produce large quantities of a high-quality end-product for consumers
• Limit mastitis infections
• Milking clean dry teats
• Reduce stress inside the parlour, on both cows and staff .
To achieve clean milk production, the first step is to understand the how’s and whys of the milking process. Then only we can determine what procedures best fit your individual dairy operation. Lastly write these procedures down and post them where everyone involved in the milking process can see them. Working strategies ought to be conveyed to workers and intermittently assessed.
Milking the animal is an art that requires skill and experience. Milking is an important operation in the dairy farm which directly affect the income. An ideal milking method is one which ensures proper labour utilization and helps in reducing the cost of milk without any detriment to udder and health. Cows are generally milked from the left side. Milking should be completed within 5 to 7 minutes.
Milking Preparation
- Tie the cow to stanchion.
- Washed the milking barn after each milking.
- Brush and wash the hind quarter thigh and udder.
- Udder region of the cow should be dried with a clean towel.
- Tie the legs along with the tail with a tight slip knot.
- Wipe the udder and teats with the towel soaked in antiseptic solution.
- Milker should wear a clean dress and cover their head with suitable caps.
- Milker nails should be trimmed and hands should be cleaned and disinfected.
- Milker should be free from infectious diseases.
- Massage the udder for a let-down of milk.
- Draw off few streams of fore milk from each teat in the strip cup and observe abnormality, if any.
- Hold the diagonal teats and milk in a full-hand method of milking.
- First few streams of the milk should not be mixed with the rest of the milk as the former contains the highest number of bacteria.
- Milk the cow quickly, silently and completely with dry hands.
Methods of Milking
Full Hand – This is the best method of milking. In this the teat is closed at the base between the thumb and index finger in this manner, and the milk that has become trapped in the teat sinus is pushed out by pressing with the other finger on the teat. This method is superior to the stripping as it stimulates the natural suckling process by calf.
Stripping – Cows having small teats are milked using the “stripping” method, which involves strongly pushing down on the teat’s base with the thumb and index finger while extending them along the whole length of the teat to force milk out in a stream. It causes more injury and irritation to teats.
Knuckling- This is a bad method of milking. In this method, the thumb is bent against the teat. It should always be avoided to prevent injuries of the teat tissues.

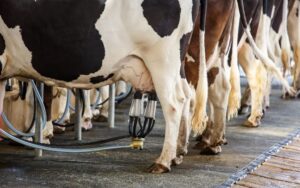
Machine Milking- It works on the principle of vacuum to extract milk from the teat. Machine milking is commonly used in herds having high-yielding and large numbers of cows. On a dairy farm, the milking process is one of the labor-intensive tasks. More and more dairy farms are converting to machine milking as a result of the rising demand for milk. Maintaining udder health and milk quality as well as achieving milking performance depends on the milking machine’s proper operation. The Machine milking unit consists of a pulsator system, vacuum supply system, and milk flow system. The suspension cup, teat-cup assembly, and connecting air and milk tubes are all part of the milking apparatus that is connected to the udder. The teat cup is made comprised of a steel outer shell and an inflation-style liner that fits over the teats.
As the pulsator functions, the inflation squeezes and relaxes on the teat, causing the milk to flow into the system. The duration of the milking and resting phases of the pulsation cycle is known as the pulsation ratio. The number of pulsations per minute is referred to as the pulsation ratio. Typically, the pulsation ratio ranges from 1:1 to 2.5:1. After cleansing the udder, apply the milking machine gently between 30 to 60 seconds. As soon as the milk flow ceases, remove the milking machine immediately by first releasing the vacuum. Dip the teat ends in an antiseptic solution to clean them. Teat cups and milk utensils are quickly rinsed with warm water.
Traditionally, the majority of dairy farmers relied on labourers or electric milking machines to collect milk from the cows or buffaloes on their dairy farms. Now by utilizing Green technology by using renewable energy milking equipment powered by solar energy, which lowers their power expenditures and labour costs can also be used.
Milking Technique for Best Quality of the Milk
These are the recommended best practices to consider for quality milk production
1. Minimize stress
The operation of milking immediately starts when cows reach the milking parlor. Bring them into the parlour calmly and gently. Hitting or yelling will cause them to become excited and stressed. Time in the holding pen ought to be limited to less than total two hours per day. If cows are stressed a steroid hormone adrenaline is released into the bloodstream which interferes with oxytocin secretion from the brain of the cow. Oxytocin is a hormone that is naturally released in the Cow’s body to signal for milk letdown. Without regular timely letdown of milk, the quantity of milk you produce may be lowered. Additionally, cows that are stressed or more likely to slip fall or defecate while entering the parlour.
2. Wear gloves
Contagious mastitis causing bacteria, like staph aureus may live on your hands and can be transmitted between cows during milking. Before milking, at least hand should be cleaned in complete with water and soap. Ideally because bacteria are less likely to adhere to gloves than rough callous skin. Latex or nitrile gloves must be worn. Gloves minimize the spread of contagious mastitis between cows and help protect the milker’s skin. They are also easier to disinfect than bare hands.
3. Clean Cows
Keep Cows as tidy as possible until they reach the milking area. Clean cows are not only exposed to fewer environmental mastitis pathogens, but they are also easier to clean prior to milking. If you want to wash a high level of your dairy animals, you might need to reevaluate how your fields or horse shelters are overseen. To improve dairy animals’ cleanliness, dirt manure or debris can frequently be expelled by hand or with a towel without the utilization of water. At the point when dairy animals are unnecessarily filthy some utilization of water might be important to clean the teats. In any case, this practice ought to be the special case and not the standard. If water is used, be sure to only wet the teats and not the entire udder because it is nearly impossible to dry the udder and this water ends up being drawn into the inflations. In addition, the usage of water in the parlour contributes to higher rates of mastitis and bacteria in milk (Pantoja et al., 2011).
4. Forestrip
Once the cow is in position in the milker’s prepared the first step in the actual process is generally fore-stripping. This involves manually removing a few streams or strips of milk from each teat. This process allows you to examine the milk for any signs of mastitis, including clotty stringy or watery milk. Also, fore-stripping helps to stimulate the teats and udder and encourage milk letdown. Effective stimulation helps increase milk flow rate and reduce milking unit time. Ideally fore-stripping is accomplished using a strip cup. Milk may also be stripped onto to the floor and hosed off immediately. Milk ought not to be stripped into the hand or towel since this would lead to spread of mastitis among teats and between dairy animals. Fore-stripping can be accomplished before or after pre dipping but absolutely must occur before drying. Often fore stripping and pre dipping are accomplished in the same task within a routine to save time. This activity will take around 10 to 20 seconds per cow to enable adequate stimulation.
5. Pre-dip
Teat should be pre-dipped with a sanitizing solution. This eliminates bacteria on teat ends prior to milking and helps to control mastitis, caused by environmental mastitis pathogens. At least three-quarters of the teat will be filled with a target of covering the whole teat while pre dipping. A non-return teat dip cup should be used to prevent contamination. The pre-dip must stay on the teats before drying for at least 30 seconds.
6. Dry teats
The teats ought to be altogether dried with a solitary assistance retentive fabric or paper towel. Never utilize a similar towel on two dairy animals. All debris manure and pre plunge buildup on the teats ought to be expelled while drying utilizing a delicate turning movement. During the drying procedure specific accentuation ought to be set on getting the teat ends spotless and dry. If not, adequately dried water containing mastitis causing bacteria may end up in the teacups and expose the open teat ends to these bacteria. In the end improperly dried teats contribute to increased occurrence of mastitis. When using cloth towels, research has demonstrated that at least two of the following must occur during laundering, firstly washing with detergent and sanitizer, second using hot water above 140℉ and number three using a heated drying cycle.
7. Attach milking units
Timely attaching the milking units. After stimulation, oxytocin which triggers milk letdown reaches peak rates 60 seconds. Milkers will then be connected within 1 to 1.5 minutes of stimulation of the teat (Jessell et al., 1977). The goal here is to coordinate milker attachment with milk letdown when milk flow is highest. Attaching too soon or too late can result in excessive milking time or reduced yield. Attach the milker without allowing excessive air into the milking system. Adjust the milking unit to hang squarely beneath the cow’s udder and arrange it and the hoses to avoid any twisting. The milking units should be checked and adjusted to prevent liner slips throughout the process. When units are not aligned properly too much milk will remain in the udder after milking and teatcups may slip or squawk. When the teatcup liners slips small droplets of milk may be forced back toward the end of the teat. When these droplets of milk contain organism-inducing mastitis, they can infiltrate the udder and result in a new infection.
8. Remove milking units
Milking units may be removed manually or with automatic takeoffs or detachers. With either process avoid over milking which can increase the incidence of liner slips and lead to teat end damage. Adjust automatic takeoffs to ensure they do not stay on too long. Additionally, milkers should resist the temptation to override the automatic detachment by putting the milker back on. When teatcups are removed manually be sure to shut the vacuum off before removal. Removing teacups while under vacuum can lead to increased infections and tissue damage. The process of machine stripping or holding down on individual teacups or milking clusters should be avoided. Properly stimulated cows milked with correctly functioning and attached units should not have excessive residual milk left in the udder.
9. Post-dip
The teats will be soaked with a post-dip for as long as possible after the milking devices are withdrawn. Documented to be an efficient germicide, through independent studies. The target would be to cover at least three-quarters of the teat as with pre-dipping. An effective post dip kills organism on teats, prevents organisms from colonizing in the teat canal and reduces the rate of new infections from contagious mastitis pathogens. Teat dip cups should be kept clean a non-return teat dip cups should be used to prevent teat dip contamination. Some dairy farmers prefer to spray the teats instead of dipping. While teats may be properly protected with a spray bottle. Total coverage is always low. Wrapping a paper towel across the teat immediately after dipping is a safe way to check the efficacy of post dipping. The purpose is to see on the paper towel a continuous line of teat dip showing the whole teat was protected. You can also notice split traces of teat dip from spraying since the teat’s opposite side is not exposed.
Conclusion
Milking operation is the major activity of every dairy farm affecting the quantity, quality and cost of the milk produced. India is still hand milked, as the majority of farmers cannot afford the costly electrical milking machine. Machine milking saves time, labour cost, increase the milk yield and ensures clean milk production and welfare of an animal.
RECOMMENDED MILKING METHOD IN DAIRY CATTLE

RECOMMENDED MILKING METHOD IN DAIRY CATTLE
Compiled & Shared by- This paper is a compilation of group work provided by the Team, LITD (Livestock Institute of Training & Development)
Image-Courtesy-Google
Reference-On Request